Register List
To access the Register List:
- Click on Settings and then on Register List and you will see the following:

Your list of registers
Listed here are all the registers that have been created in the CASSA system.
From here, you can:
- View Active/Inactive Register List
- Add New Register
- Activate/De-activate Register
- Assign Register
- Edit Register
- View Register
- Delete Register
- Search for a Register
- Export Register
- Print Register
View Active/Inactive Register List
The Register List displays all Active and Inactive registers. The Active Register List is shown by default (by active we mean all registers that have the Active attribute selected).
To view the Inactive Register List, click on the Inactive Register List button and the screen will refresh to show all inactive registers.

Inactive registers list
Add New Register
The procedure for adding a new register is quite long (it’s the longest end-to-end procedure in the CASSA system and will take about 30-minutes to do. Once you've seen how the system works it will get faster, but it's best to see the entire process first.)
The procedure incorporates 5 steps:
- Step 1 – Basic Information
- Step 2 – Select Form
- Step 3 – Select Fields
- Step 4 – Cycle Notification Settings
- Step 5 – User Notification Settings
We're going to use a sample form for this exercise.
My Example
The example form we’re going to use for this sequence follows. It’s going to be part of our Plant & Equipment Register:

2.To set this up, we now need to:
a. Add new register
b. Create a new form
c. Create the fields to add to the form.
I hope that sequence sounds logical: we first add the register, then create the form, and then add fields to the form.
After that, we then need to setup some notifications, but creating the register, the form, and the fields takes up the bulk of the initial process.
Once you're familiar with this process...
...you’ll see that you can create your form fields first, then you can create the form and assign the fields to it, and then you can, finally, add the form to the register and set the notifications.
But for this first exposure, we’ll do it top-down first so that you can see the whole process in its entirety.
Add New Register
To add a new register:
- Click on the Add New Register button and the Add New Register form will display:
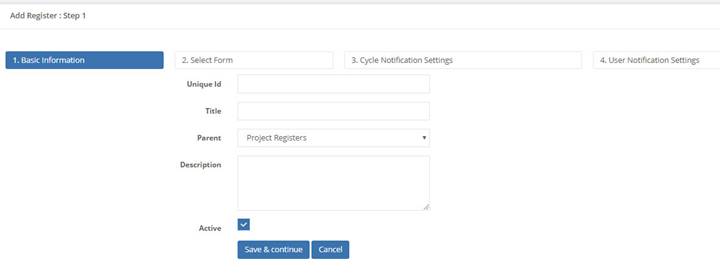
Step 1 - the add new register form
- As you can see from the image above, 4 steps are shown. However, as explained we’ve broken down step 2 into 2 steps, but this’ll become more apparent as you work through.
Step 1 – Basic Information
- Here we will enter the following:
- Unique ID – this identifies your register item. We recommend picking a naming convention for your fields and then sticking to it (refer to Naming Conventions).In the long run, this will make it far easier to locate and manage all your items, not just registers.
- Title – this is the main title/name of the register and is what will appear in the grid under the Title column.
- Parent – this is a drop-down list. If this is a top-level menu item, then select Root. If it’s a sub-menu of an existing menu item, then select from the drop-down list:
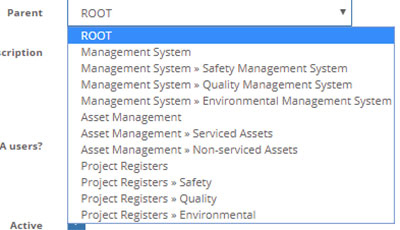
A dropdown of your menu structure
- Description – enter a useful description of the register
- Active – if you don’t want this register item to be visible then deselect this checkbox. This will mark it this item as inactive.
- Once the Basic Information is complete, the form will look similar to this
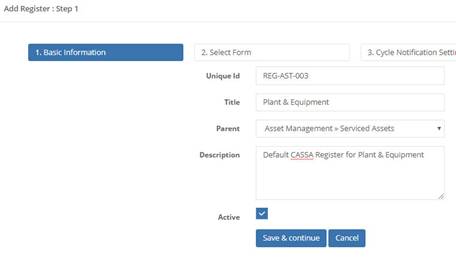
The completed basic information
- Click on Save & Continue.
Save your work
It’s important that you click on Save & Continue throughout this entire process because if you change pages before saving your work there won’t be a prompt, and any entered information will be lost.
Step 2 – Select Form
Step 2 of the Add New Register process involves selecting or creating your register’s form.
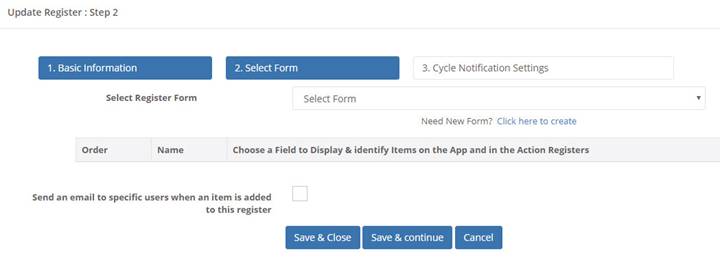
Step 2 is where you will select an existing form or create a new one
-
Either Select a Register Form or click on Click here to create a new form. This procedure will follow the select a form flow; however, click on this link to Create a New Form , if required.
-
Click on the Select Form drop-down list and the following will display:
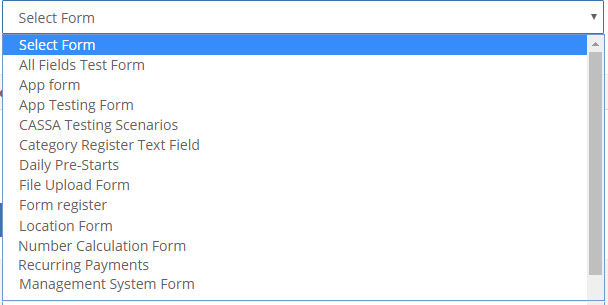
The drop-down list displays the list of already created forms
- Select the form you require and the corresponding form details will list as shown:
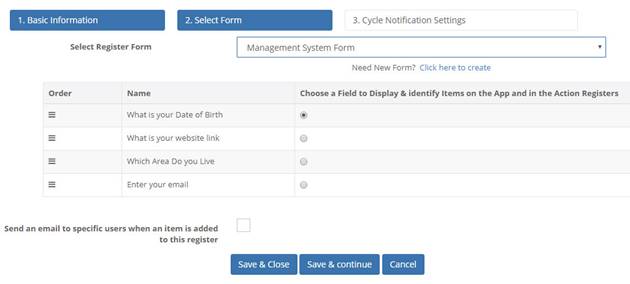
The form details will display as shown
- You can select to use this form, or you can rearrange the field order and then select to use this form by clicking on either Save & Close or Save & Continue.
Now we’ll look at the Create New Form functionality. With this, you can add your own customized registers .
Create New Form
As you can see, once you’ve created a few forms, it’ll be much easier to use Select Form and click on the one you need. But, there will be times, especially at first, when you will need to create a new form:
- Click on Click here to create a new form and the Add form dialog will display:
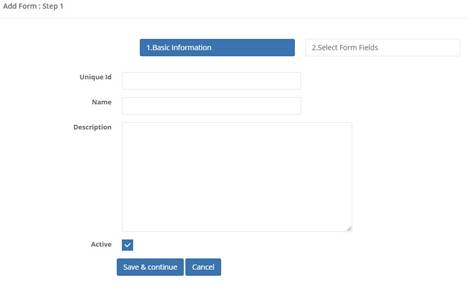
The add form dialog
- Now we will enter the form’s Basic Information:
- Unique ID – this identifies your form. We recommend picking, and sticking to,a naming convention for your fields (see Naming Conventions).
- Name – this is the name of the form
- Description – enter a useful description of the form
- Active – if you don’t want this form to be visible then deselect this checkbox to mark it as inactive.
Once complete, the form will look similar to this:
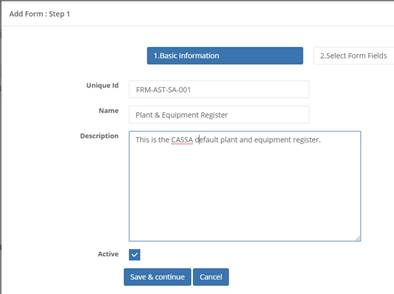
The completed basic information
- Click on Save & Continue to proceed to Select Form Fields. The form fields dialog will then show.
Step 3 – Select Fields
Note: as mentioned previously, this isn’t an extra step in the release version of CASSA, but the UI will soon be changed to reflect this. Adding a New Register and creating a new form and creating and assigning fields makes for one huge procedure and may seem quite daunting at first. But, when you can see the whole process, the steps, and what comes next, it is much easier.

Here's where we can add a new form field or choose an existing one from the library
- Select either Add New Form Field or Choose From Library. For this example, we’ll use Add New Form Field. So, click on the Add New Form Field button and the following dialog will display:
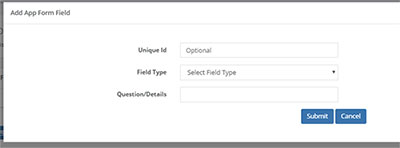
The add new form field page
- Again, add your Unique ID, and then select the Field Type from the drop-down list:
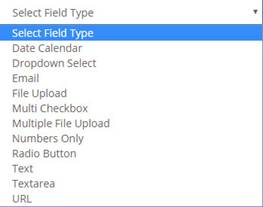
Select the type of field it is from the drop-down list
The drop-down list permits you to select from the following field types:
- Date Calendar – insert a date picker field from which the user can select a date.
- Dropdown Select – you can create your own drop-down list containing any number of options (to add additional answer options, refer to Add Answer Options, below).
- Email – add a field where the user can insert their email address.
- File Upload – this inserts the functionality to permit the user to upload a single file.
- Multi Checkbox – this allows you to insert a number of tick checkboxes (refer to Add Answer Options, below).
- Multiple File Upload – this inserts the functionality to permit the user to upload multiple files.
- Numbers Only – a special field type, this only permits numbers to be entered.
- Radio Button – unlike a checkbox, which allows multiple boxes to be ticked/checked, a radio button allows only a single choice from the listed options (refer to Add Answer Options, below).
- Text – this inserts a small text field where you can enter a maximum of 256 characters.
- Textarea – this inserts a larger, expandable text field where you can add a larger amount of text (maximum character count TBC).
- URL – adds a field where the user can insert a web address (URL = Uniform Resource Locator).
Example Field Set
Going back to the example form (from Add New Register):

A refresher on our example form
As shown in the header row, we need to add the following form fields:
- Description
- Serial No.
- Last Maintenance Date
- Next Inspection Due
- Mechanic.
-
The first field that we need is Description. There’s a high likelihood of there already being a description field in the library, so click on Choose From Library to check there first.
-
The field grid appears, so type Description into the Search field:

Using the search field to find if a field already exists
- Description pops up long before the entire word is added, so click on Select and then on the Add to Form button. The Description field is added.

The description field is added to our form
- Next, we need the serial number field. Again, check the library again to see if one already exists. Click on Choose from Library, type in Serial, and you’ll see that there is:
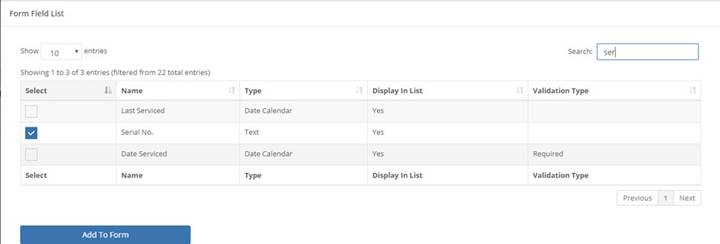
The serial number field also exists in our library
-
Click in the checkbox to select it, and then on Add to Form to add the selected field to the form.
-
Repeat for Last Maintenance Date. The form now looks like:

Our form with 3 fields added
- Go back into the library by clicking on the Choose from Library button, and search for Next Inspection Due in the same way we did before. But, there is no field that matches, so we’ll need to create a new one.
Create a New Field
-
To do this, click away from the dialog box to close it and return to the form update screen.
-
Now, click on Add New Form Field to display the Add App Form Field dialog.
-
It’s time to enter the required details, so enter the Unique ID in accordance with your organisation’s Naming Conventions.
-
As this field is a date, select Date Calendar from the Field Type drop-down:
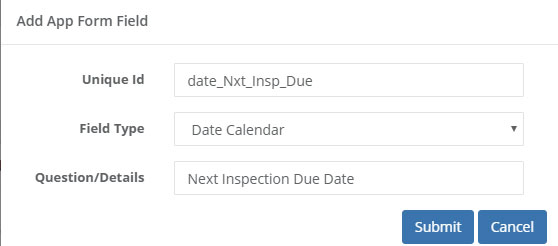
Adding our new field
-
Click on the Submit button to add it to the form.
-
Now we’ll add the final field, Mechanic, as a text field.
-
Click on Add New Form Field.
-
Enter the required details (Unique ID, Field Type, and Question/Details):
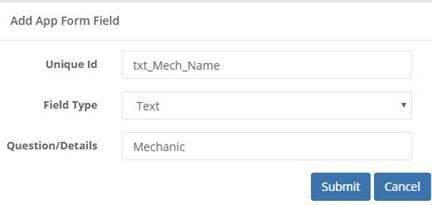
Entering the details for our mechanic's name field
- Click on Submit and the field will be added to the form:
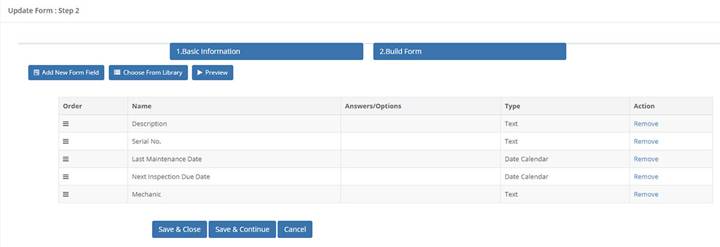
Our 2 new fields are also added
- That’s our form completed. If you wish to rearrange the fields, then click and drag the left icon to reposition it:
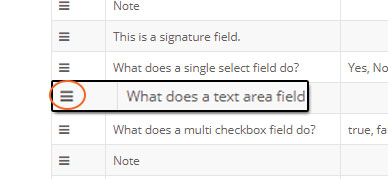
Repositioning fields
- Click on the Preview button to see how your form will look when live:
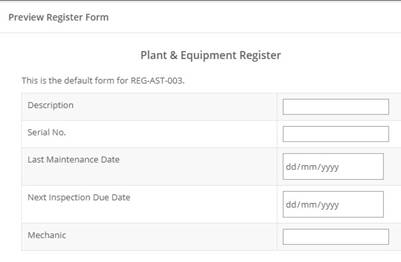
Previewing the form
- Click away from the form to close the preview window and then click on Save & Continue to continue our original and main Add New Register process.
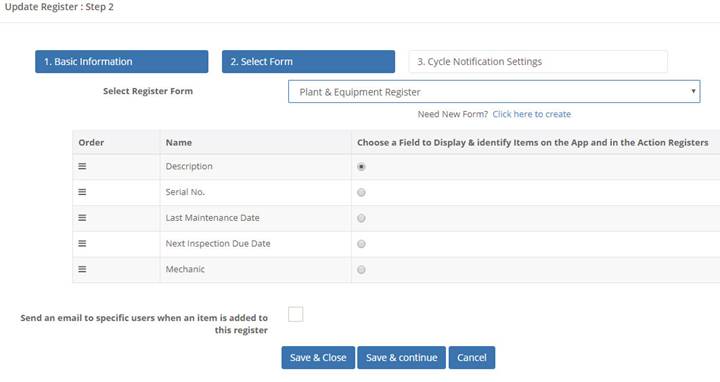
Continuing on with our Add New Register process
That’s the new form added to the register.
Before we proceed to Step 4 – Cycle Notification Settings, we need to look at one additional option open to us: Send an email to specific users when an item is added to this register.
Send an email to specific users when an item is added to this register
-
If you wish this to be done, then select this checkbox.
-
As soon as you check this, the Users to be notified and the Email Template for Notifications options will be made available:

The Users to be notified and the Email Template for Notifications options will be enabled
- Click on the Roles Users drop-down arrow to expand the user selection:
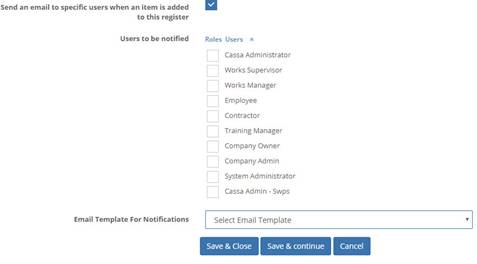
Here you can select or deselect the roles and users who are to be notified
- Select the Roles/Users (or just roles if no users are listed) and then select the email template to be used to notify them:
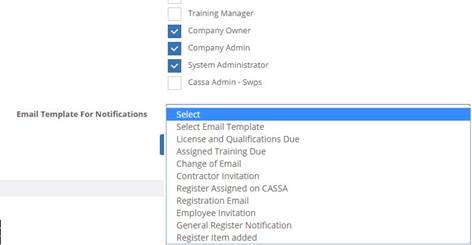
Select the email template you wish to use
- Once complete, click on Save & Continue to proceed to step 4.
Add Answer Options
Certain field types, namely, Dropdown Select, Multi Checkbox, and Radio button allow you to add multiple answers. The functionality for adding multiple answers is the same:
-
Select the required field type and then add the Question you want to ask; or, if it’s an instruction rather than a question, the details for that field.
If you select a field type where there are different answer options, then you can add, modify, or delete the answers. -
For example, if we select a Multi Checkbox field type, then we’re presented with the following:
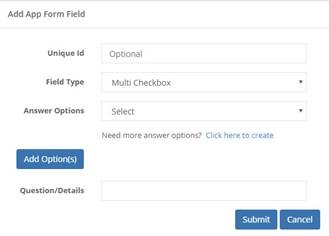
The multi checkbox field type
- Assuming you’ve already added your Unique ID and the Question/Details, click on the Add Options button to add a single option. You can then repeat for the required number of options:
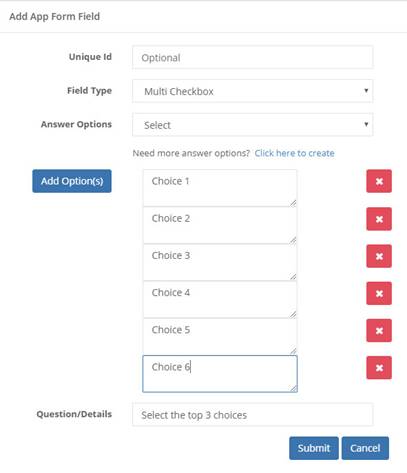
You can multiple options to this type of question
-
Add a value to each new field.
-
If you need to delete an option, then click on the corresponding X button.
-
When you’ve added all your options and are ready to submit the form, click on the Submit button. The form will close, and it’ll be added to the register.
-
Alternatively, if you wish to discard any changes, click on Cancel. The form will close, and any changes lost.
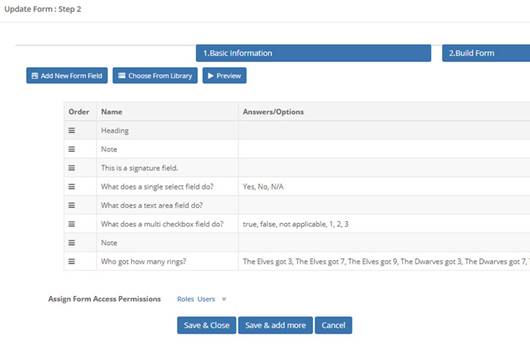
Your updated form
If you want to add another new field, you can either:
- Click on Add New Form Field and the dialog from before will open and you can select a new field type.
- Click on Choose From Library – we cover this in App Fields, but all fields that are created in the app are added to the library for reuse. Click on this button to open the library and where you can then select and insert an already created field.
You can click on the Preview button to see how your form currently looks.
Step 4 – Cycle Notification Settings
We’ll now continue with step 4 of our adding a new register.
Cycle Notifications are set to notify you via email when selected items within your business need actioning. Actions such as maintenance due dates, equipment expiry dates, and so forth.

This is where you set your cycle notifications
The settings are as shown above:
- No cycle required – no emails or other notifications are communicated
- Group items with same review or expiry date and only send one notification – this is used when you have a number of similar items which need notifying at the same time. For example, you have 50 or so hand tools which all need re-testing, you’re not going to want 50 emails all saying the same thing. This setting allows you to group them and just receive 1 notification for the group. Further details are here.
- Send notification for each individual item in register – unlike the previous option, this will notify you for each item in the register.
- When you click to select group all items and send one notification, the following will display:
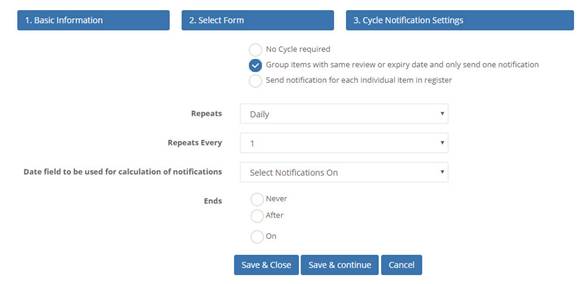
The group all items and send one notification form
- Here you will select:
- Repeats – this is a dropdown with options of Daily, Weekly, Monthly, and Yearly.

The repeats drop-down list
- Repeats Every – select the length of the repeat cycle. This is used in conjunction with the Repeats field, above.
- Date field to be used for calculation of notifications – another drop-down list, this time from the form you’re working on/have just created. Select the date field you wish to use:

Select the date filed that is to be used to calculate the notifications
- Ends – this is when the notification ends. Select from:
- Never – the cycle never ends.
- After – this is the number of times the notification occurs. When the number of times has expired, the notifications end.
- On – select the date the cycle ends.
- Once you’ve selected your required settings, click on Save & Continue.
Send notification for each individual item in register
If you select this option, you’re also given the choice to Create separate tracking instances for each notification cycle.
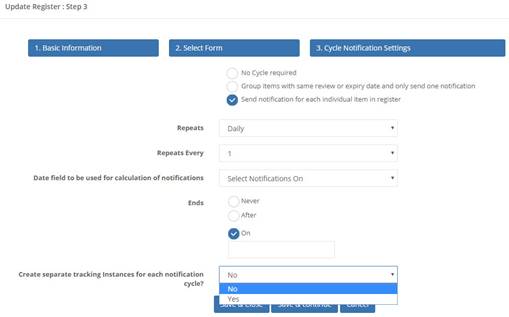
This option permits you to create separate tracking instances for each notification cycle
This creates a separate tracking cycle for items such as daily reports, weekly audits, or monthly inspections that require tracking and actioning each time.
-
Select Yes to create a separate cycle based on the cycle notifications specified.
-
Click on Save & Continue when ready.
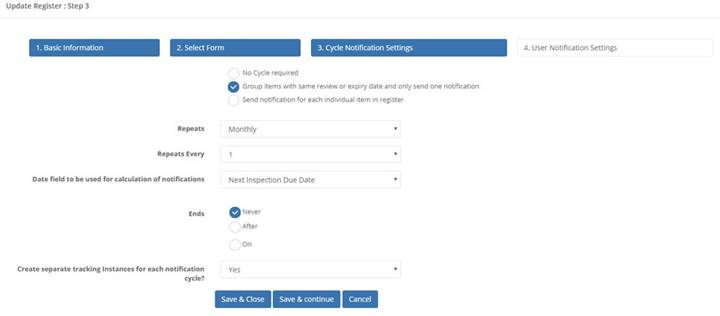
Our form now ready for step 5
Step 5 – User Notification Settings
In the final step, you will select your user notifications:

Here's where we select the user notifications
- Click on the Add More button and the following will display:
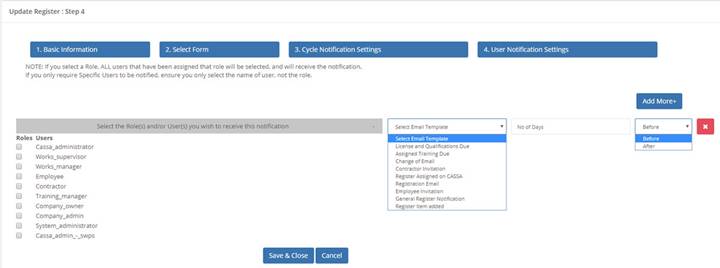
Select the roles/users to be notified, the template to be used, and the numbers of days before/after
-
Select the Roles and/or Users who are to be notified.
-
Select the Email Template to be used and then select the number of days required.
-
Finally, select whether the number of days refers to before or after the event in question.
In addition:
- Click on the Add More button to add more notifications.
- Click on the red X to delete a user notification.
- When complete, your user notifications will look similar to the following:
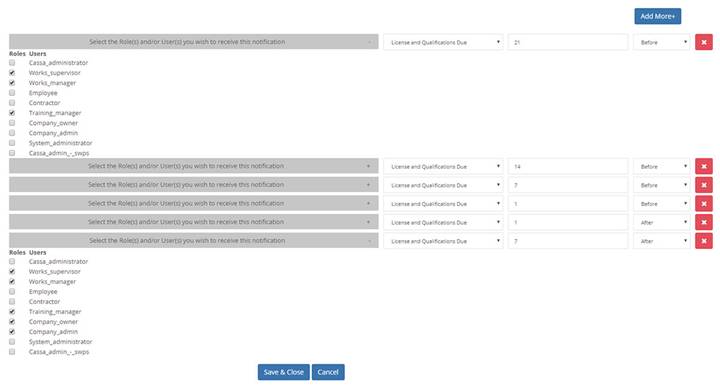
A sample of how your user notifications may look
- Click on the Save & Close button to close the form and return to the List Registers.
Congratulations, you’ve just added your new register.
Now, I know it was a bit of a beast to follow, but it is the most difficult part of using CASSA. Also, I hope you can see that when you break it down into the separate steps and save regularly, and because it follows a logical process,it isn’t that daunting.
Of course, and as with any procedure, it’ll become much easier when it’s familiar to you.
Activate/De-activate Register
Within CASSA, registers are either Active or Inactive. You can see their status at a glance in the List Registers grid and, if you recall, we also have 1 button for the Active Register List and another for the Inactive Register List.
- Click on whichever button you wish to view the appropriate register list.
- Identify the register you wish to change the status of:
- If the current status is Active, click on De-activate to change the register’s status from Active to Inactive. Confirm this when the Update Register Status dialog box shows. The register will then become inactive and will be moved to that register.
- If the current status is Inactive, click on Re-activate to change the status from Inactive to Active.Confirm this when the Update Register Status dialog box shows. The register will then become inactive and will be moved to that register.
Assign Register
To assign a register to a role:
- Identify the register in the appropriate active or inactive register grid:

Locate the register you wish to assign
- Click on the Assign Register button and the Roles Users list will show:
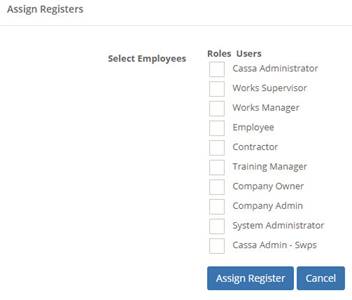
Assigning registers to roles and users
-
Click on the specific Roles or Users to select them, and then click on Assign Register.
-
The confirmation message Category Register Assigned Successfully will display:
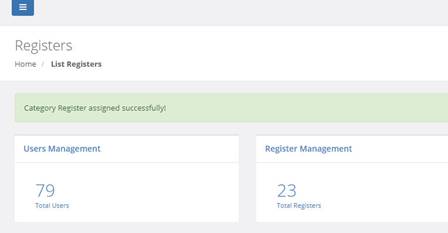
Category Register Assigned Successfully message will display
Edit Register
To edit a register:
-
Identify the register in the appropriate active or inactive register grid.
-
Click on the Edit button and the register will open for editing:
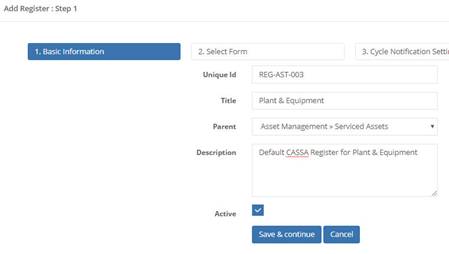
Editing a register
- You can now edit all aspects of the register. Refer to Add New Register for further information.
View Register
To view a register:
-
Identify the register in the appropriate active or inactive register grid.
-
Click on the View button and the register will open:

Because it’s in View Mode you can only view the details of the register. If you wish to edit the register, you will need to open it for editing. Refer to Edit Register for further details.
Delete Register
To delete a register:
- Identify the register in the appropriate active or inactive register grid:
- Click on the Trashcan button and the confirmation dialog will display asking you to confirm you wish to delete this register.
- Click on Yes to confirm, the dialog box will close, and the register will have been removed from the grid.
Search for a Register
Now we’ll search for a register:
-
Click in the search field and start entering your search term.
-
We’ll look for ‘Plant & Equipment', as that’s the register item we created, but as soon as we type ‘Plan’ there’s no need to complete the full search term as the filter has isolated the records and there it is at the top:

Using the search function
- Now you can select from the filtered results.
Export Register
Also, in that same toolbar, you can export the Register grid in either the csv or the xlsx format:
- If you want to export the entire grid, ensure that no search filter is in place (delete the text from the search field to do this). If a search filter is in place, only the filtered results will be saved to the downloadable file.
- To export as csv, click on the csv button and the Save As dialog will open to allow you to save the file to your computer.
- To export as an Excel spreadsheet, click on the Excel button. Again, the Save As dialog will display and allow you to save the file to your pc.
- You can now open the file and view it in the normal manner.
Print Register
You can also send the register grid, filtered or unfiltered (as before), to the printer:
-
Click on Print and the print window will open.
-
You can now change the print settings, such as Destination printer, the number of pages, page orientation, etc. The actual settings all depends on your own printer.
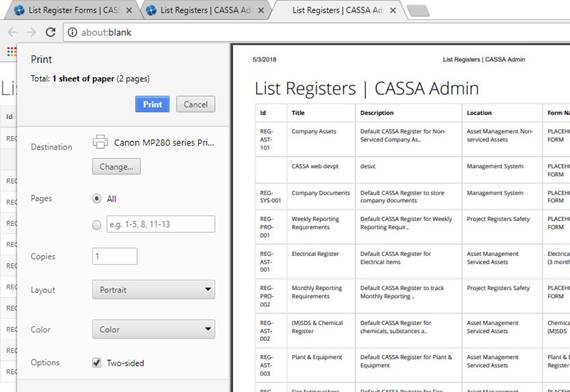
Printing out CASSA registers. This will look different on your device
- When ready, click on the Print button. The dialog box will close, and the selected print job will be sent to the printer.
Updated almost 5 years ago
