Course Setup
CASSA gives you the functionality and the capability to create your own internal courses.
To get started, click on the Course Setup button and you’ll be taken to the Course Setup Dashboard:

The Course Setup Dashboard
Here you can access the following sections:
Note:there are essentially 3 separate components or parts to creating a course:
- Course Instructions
- Course information
- Course questions (either import and/or create individually).
We’ll walk through these in order. Bear in mind that these components are created in separate stages - this might help make it easier.
Instructions
This is where you will add the general instructions for your course.
Course Instructions
At present, you can only add 1 set of general instructions to be applied to all your courses. We will expand this functionality to allow for separate instructions on a per course basis in a future update
- Click on the Instructions button to go to the instructions page. You will see:
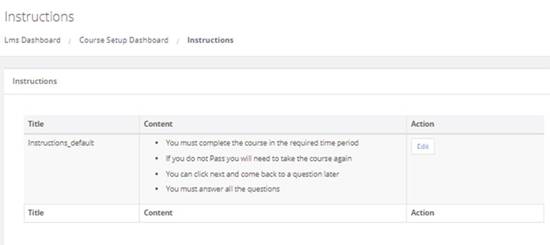
The course instructions page
- As you can see, we have the default set of instructions. Click on Edit to modify them and the default editor will open:
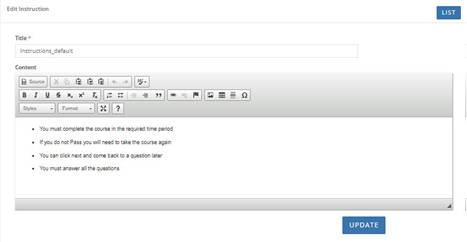
The editor where you can modify your course instructions
- Edit the instructions in the usual manner. Once complete, click on Update and your changes will save, the screen will refresh, and you’ll be returned to the main instructions page.
Assign Course to Role
When you’re ready to assign courses to your employees you will assign them to roles, users, or contractors. Within Course setup:
- Click on Assign User to Role, and the assign to role page will display:
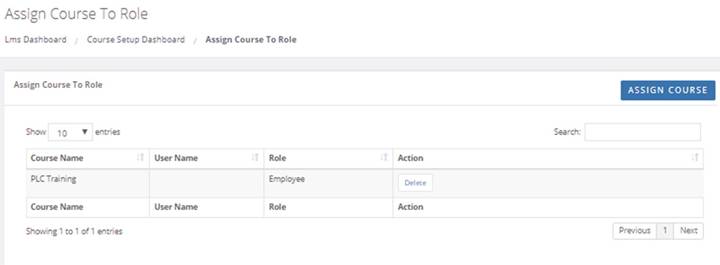
The assign course to role grid
- Here you can:
Assign Course
To assign a course:
- Click on the Assign Course button and the assign course dialog will display:
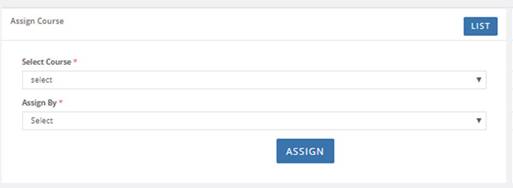
Here's where you assign your course to your team: by role, user, etc.
Here you can:
- Return to the List – click on the List button to return to the list grid.
- Select Course– here you can select any Company Specific or CASSA Online Training courses.
- Select Assign By – you can assign the selected course to either a Role, a User, or a Contractor
Where possible, we would always recommend assigning a course to a role, because when you then add an employee or a contractor to that role, then that training will automatically appear in their profile. This will occur for every person that’s added to that role.
However, if you assign the courses individually to employees or to contractors, then it’s many times the work.,
- Select the course you require and then select to whom it is to be assigned (role, user, or contractor).
Assign to a Role
- If the course is to be assigned to a role, then a list of roles will appear (the selections are blank by default; I ticked all):
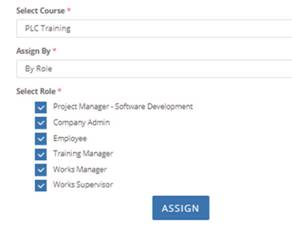
Assign course by role
- Select the roles to which it will be applied, and then click on the Assign button to assign it. The screen will refresh, and you’ll be returned to the list grid where the assignments will display:

The grid listing all assignments
Assign to a User
- If the course is to be assigned to a user, then a list of all your users will display:
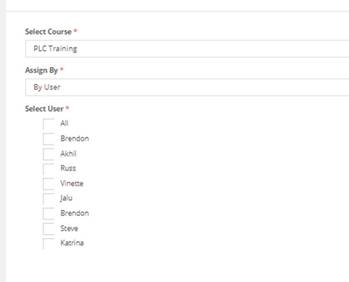
Assign course by user
- Make your required selection and then click on the Assign button. The screen will refresh, and you’ll be returned to the List grid where the assignments will display:

The grid listing all assignments
Assign to a Contractor
- If the course is to be assigned to a contractor, then a list of all your contractors will display:
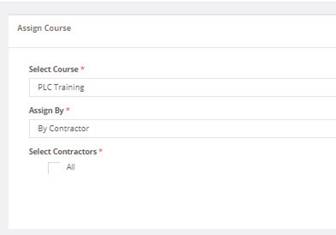
As you can see, I don’t have any contractors added yet, so none are listed. But adding them is the same as with roles and with users.
Delete Course
Once you’ve assigned a course to your team, whether it’s by role, user, or contractor, you then have the option to delete them.
- In the Assign Course to Role list, identify the course you wish to delete.
- Click on the Delete button and the confirmation will display:
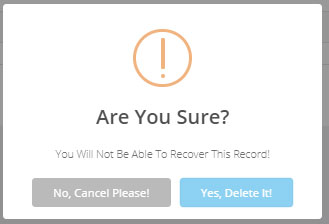
The delete confirmation will display to ensure that you really want to delete the item
- Click on Yes, Delete It! to delete the course. The dialog will close and the course will be deleted from the grid.
Search For a Course
Refer to Search for a Record for further details.
Create/Edit Course
To create or edit a course, click on the Create/Edit course button and you will be taken to the Create Course dashboard:

The Create Course dashboard
Here you can view a list of already created courses, as well as perform the following main functions:
In addition, on a per-course basis, you can also carry out the following actions:
Create Course
To create a course:
- Click on the Create Course button and the Add Course form will display:
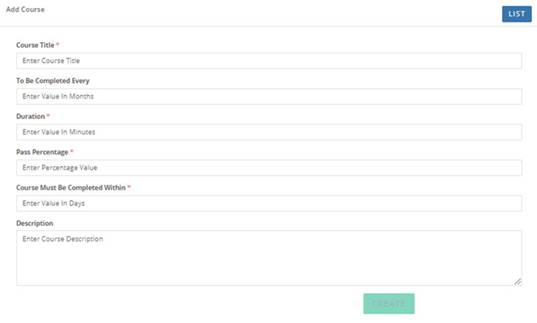
The add course form
Course Information
This form lists the main Course Information
- Here you must enter the following information:
- Course Title – no explanation necessary here (we hope). Try and keep it short and succinct.
- To Be Completed Every – This is the cycle duration in months, i.e. this course must be retaken every 6 months or every 12 months, etc.
- Duration – the length of time (in minutes) that the testee has to complete the course
- Pass Percentage – what the minimum percentage is to successfully complete the exam
- Course Must Be Completed Within – this period determines how long an employee or contractor has to complete the course once it’s been assigned to them. This figures in in days. For example, if you enter 28 here, that means they have 28 days to complete the course.
- Description – enter a useful description of the course, what it involves why it’s important, and so forth.
-
Once you’ve completed the required fields, the Create button will be enabled. Click on it to create your course.
-
The screen will refresh, and the Course list will display with your newly added course:

The grid listing your newly created (and other) courses
Next, we need to Import Questions.
Import Questions
Adding questions 1 at a time to the CASSA interface is doable, but it isn’t the fastest method.
No, the fastest way is to create the questions in a spreadsheet and then import the file into the system. That way, not only do you have an offline record of your own questions and courses, but you can also use it as a template to create additional courses, easily modify it, and so on.
- To get started, click on the Import Questions button:
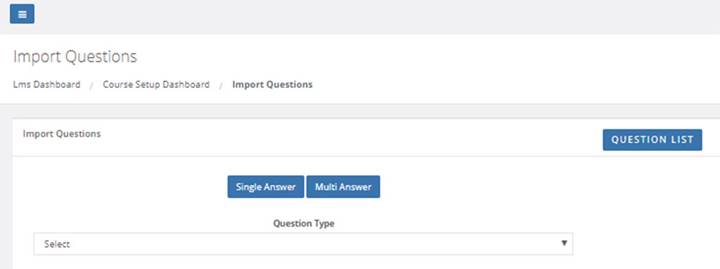
Importing already created questions is the fastest way to setup a course in CASSA
You can see that you have the Question List, Single Answer, and Multi Answer buttons, as well as the Question Type dropdown list.
-
Click on the Question List button to return to the main questions page
-
Click on the Single Answer button to download a spreadsheet for single answer questions (questions_radio_template.xlsx)
-
Click on the Multi Answer button to download a spreadsheet for multi answer questions (questions_checkbox_template.xlsx)
-
Click on the Question Type dropdown and select from either Single Answer or Multi Answer to display the Choose File button, where you can upload and import the corresponding question spreadsheet:
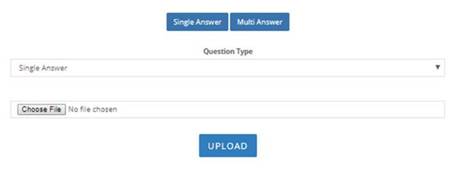
- Click on the Choose File button and navigate to and select your spreadsheet.
- Click on the Upload button to initiate the import.
- The spreadsheet will import, and the questions added. You will see the success message, Successfully imported Questions!, and be taken to the Courses
Create Questions Using the Spreadsheet
To create questions using the spreadsheet, you will have needed to have downloaded the spreadsheet to your pc.
For the most part, the 2 spreadsheets are essentially the same. I’ll cover the differences at the appropriate time
However, before we even get to filling in the spreadsheet, we need to a little planning.
Planning
Filling in the spreadsheet and uploading it to CASSA is really easy, but there are a few quidelines to making it all as smooth as possible:
-
Plan your course, i.e. what’s the aim, what will the get out of it, what you’re actually going to achieve with the course. Having a clear objective is essential, otherwise the course may be too broad and try to cover too many things.
-
Decide how long your course is going to be. This could be 10 questions, 20 questions, and so on. The number of questions will be determined by your actual course objectives and what they need to do to achieve them.
-
Think about the types of question you’re going to ask. Yes, these are single answer questions, but what format will the question take? Is it a text question (a written question)? Is it a video, a pdf document that they need to read first to answer?
-
How long will they get for each question? Do all questions of the same type, such as text-questions, get the same length of time? The purpose of a training course is to get them to display their level of knowledge, not to be tricked into running out of time. So, give them what they need.
-
Do all questions and answers carry the same weight? Some questions may be more important, more complex, or require greater thought than others. So, do these acquire more marks if they get them right?
-
Also, with your questions, do you want to provide a hint, so they can get a little nudge in the right direction if they can’t come up with the correct answer?
-
Be careful of ambiguous questions or multiple answers. The former is never a good idea and, though multiple answers can and do work, they don’t in a single answer formatted question/answer test.
Populating the Spreadsheet
To populate the spreadsheet
-
Open the single answer spreadsheet (questions_radio_template.xslx). The assumption is that you know a little bit about Excel. If you don’t, I can only suggest asking someone to help you fill the spreadsheet in. It’s not complicated, but it’ll make it easier for you.
-
Click on File and then on Save As. Save the spreadsheet with your course name, etc. When done, this will take you to the spreadsheet:

The spreadsheet for creating your course, questions, answers, and other elements
- As you can see, we have the following columns:
- question_type – all questions are radio type and every single question you enter must have ‘radio’ in this column. If you miss one, that question/row will not be imported
- question_order – this is the number order that the questions will be listed in, once imported. If you already have questions in your course, then make sure the numbers here follow on from those in your course and they will be appended to your course, rather than overwriting them.
For example, if your course already has 3 questions in, then numbering these new questions 4+ will ensure that they aren’t overwritten.
Our recommendation is...
to use 1 spreadsheet/document for 1 course and to keep all your questions for that course in that spreadsheet. This makes it easier to manage and track and will avoid accidentally overwriting existing questions and so forth.
- question – this is the actual question itself. Please insert all required punctuation.
- marks – the number of points or marks awarded for correctly answering this question
- time_to_spend_secs – the length of time (in seconds) they have to answer the question
- hint – if you want to provide a clue to help jog their memory, then enter that here
- total_answers – the total number of answers to this question
- correct_answer – which of the answers here is correct
- answer1, answer2, answer3-x – these are the actual answers you need to provide. The number of answers you provide must match the number given in total_answers, above. If it’s incorrect, or you have a blank answer, then the question will not be imported.
- If you need to add multiple columns to add additional answers, that is permissible.
- If you add additional columns for extra answers, e.g. answer5 and answer6, you do not need to provide additional answers for questions that only have 4 answers or less – as long as the value in total_answers for that question matches the correct number of answers.
- course_id – this is the ID of the course these questions will be added to. It’s found on the main grid (and other areas where the course is listed):
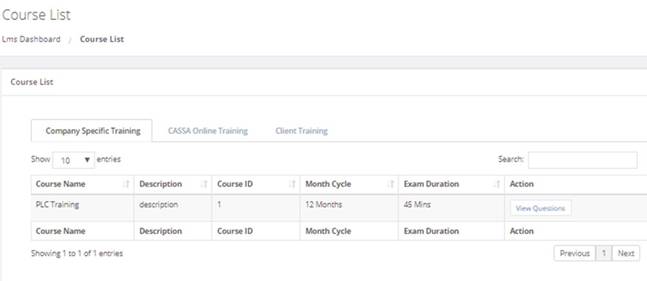
This is where your Course ID is located
Good Import Sample
So, let’s look at a ‘good import’ sample:

Sample of 'good' import data for your course
Points to note
Here you can see:
- Every row/question has radio in column A.
- Not every field is filled out, but the important, required fields are.
- Row 2 and 3 both have answer5 filled in (column M) filled in, but the question in row 2 only has 4 answers (answer1-answer4) – as long as the number of answers (answer1, columns I; answer2, column J; answer3, column K, etc.) is greater or equal to the value in total_answers then this will work.
- You’ll note in column B that I’ve jumbled the order of the questions. This was because this image was taken during testing. However, Excel will let me sort these in order, and that’s what I would recommend that you do.
- Click in cell B1.
- Click on Home > Editing > Sort & Filter > Custom Sort
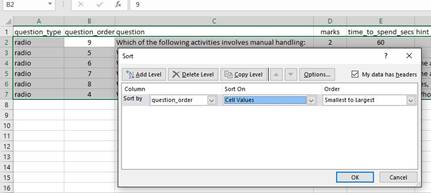
Creating a custom sort in Excel
- Sort based on Cell Values and Smallest to Largest and click on Ok. They’ll be sorted neatly in order:
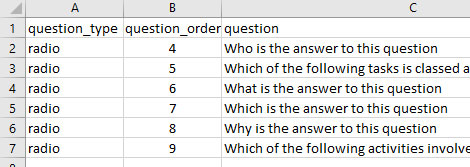
Sorting your questions in the correct order
Note: again, we recommend that you list all questions in the spreadsheet. So, your sheet will include questions 1, 2, and 3. This will make it easier to manage in the long-term. The above is just for illustrative test purposes and taken during testing.
- When the spreadsheet has imported, you can view the questions:
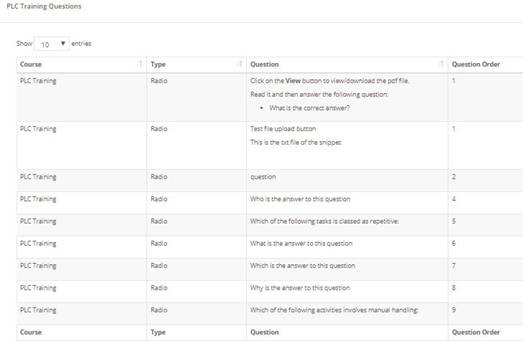
Bad Import Sample
Now let’s look at a bad import sample. I’ve duplicated the image below, so you can clearly see what’s amiss in the top, uncluttered version:
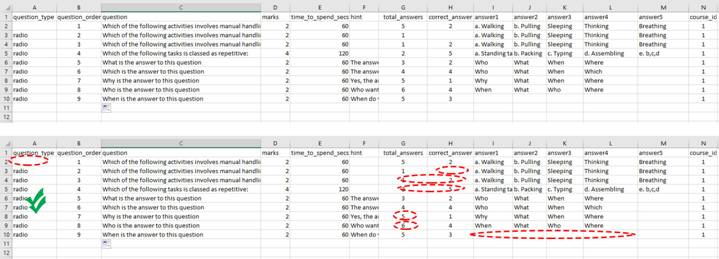
A bad import sample with highlighted areas
Only rows 6 and 7 are good samples here – they’re the only rows that CASSA will import. Yes, row 6 has 4 answers listed (answer1-answer4), but this is allowed because column G, total_answers, states there are only 3 answers for this question.
Let’s look at why the other questions will not be imported:
- Row 2 – cell A2 is blank. It needs to have ‘radio’ inserted there, the same as the cells below it.
- Row 3 – despite having total_answers and answer1-answer5, there is no correct_answer listed, so this will fail.
- Row 5 – this will fail because the correct_answer is shown as 5, but there are only 2 total_answers. The correct_answer value has to be ≤total_answers (less than or equal to total_answers).
- Row 8 – will fail because though 5total_answers are specified, there is no answer5 (cell M5 is blank).
- Row 9 – will fail for 2 reasons: we have 6 in the total_answers cell, but though there is an answer5, it’s blank, and there is no answer6column.
- Row 10 – this fails because no answers have been given.
This list is not exhaustive, but it shows the common errors that are made when importing questions.
Multi Questions Spreadsheet
Now let’s take a look at the Multi Answers spreadsheet:

A sample of the multi-answers spreadsheet
The only differences between the Single Answer spreadsheet and the Multi Answer spreadsheet are:
- Column A must have the word checkbox instead of radio. Radio buttons allow single answers, checkboxes allow multiple answers.
- total_correct_answers (columnH) can be ≥1 (and ≤answer1-answerx)
- correct_answer can have more than 1 answer, comma-delimited (this means separated by a comma)
The other fields are the same.
Things to Watch Out For
- A cell in column A is blank or has checkbox spelt incorrectly.
- The total_correct_answers value is less than or equal to the number of answers listed. As in the Bad Import Sample, row 5.
- The correct_answer value(s) do not correspond to answer1, answer2… and there is a blank field.
These are the most common errors.
Edit Course
To edit a course:
- Identify the course in the course list, and then click on the Edit button
- The course instructions will open for editing:
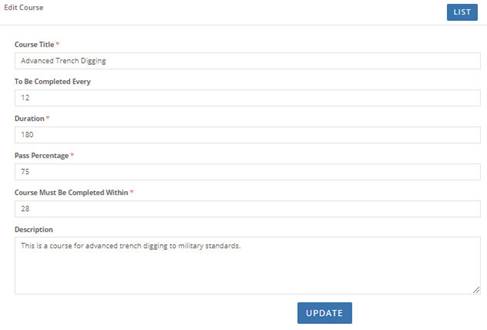
- You can now edit all aspects of the course information. Once done, click on the Update button to save the changes, refresh the page, and return to the course list.
Delete Course
To delete a course:
- Identify the course in the course list.
- Click on the Delete Course button and the delete confirmation dialog will display:
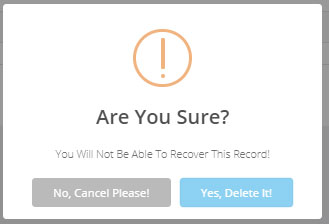
The delete confirmation to ensure that you really do want to delete the course
- Click on Yes, Delete It! to delete the course. The screen will refresh and the course will have been deleted from the course list.
View Questions
Clicking on View Questions will display the following:
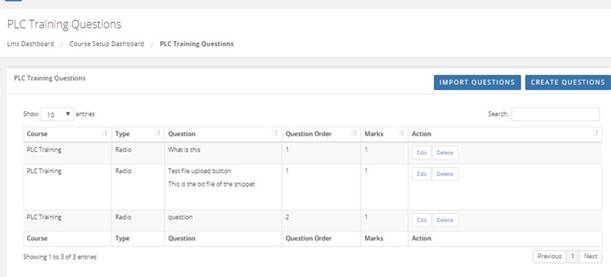
A sample view of the quiz questions
As you can see from the image above, we can see the following fields:
- Course Name**** – in this instance, it’s PLC Training Questions
- The question grid, including the following fields:
- Course – you can add multiple courses to CASSA
- Type – this is the answer type. The answer will be one of either: Single answer/radio, Multi Answer, Embedded a Video, or Audio,
- Question – the question that the testee must answer
- Question Order –
- Marks – different questions can have a different ‘weight’ applied to them,e.g.. a question with multiple answers may earn more marks than one with a single answer
- Action – the actions that you can take with the selected question. Here, we can see we have the Edit and Delete buttons
- Import Questions button
- Create Questions button
- Search for a Course field
Create Questions
If you want to add questions individually, modify existing questions (if you want to add images to them) or you want to add a video or an audio question, then you can use the create question function,
- Click on the Create Question button and the create question form will display:
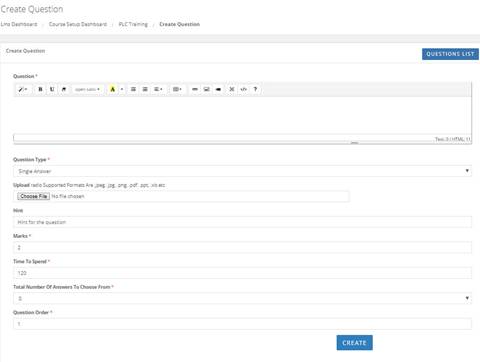
The create question form where you can, lo-and-behold, create a new quiz question
As you can see, there’s a fair bit going on here, but it’s quite straightforward:
- Questions List button – click here to return to the questions list on the previous screen (the training questions screen)
- Question – a required field, this is where you edit the question itself. It’s what’s called a Rich text editor field, which means that you can format your question in a number of ways. This is a standard-html editor and it’s beyond the scope of this help to walk you through it.
- Question Type * – The type of question. This is a required field and is read-only on this screen, and will be one of either: Single answer/radio, Multi Answer, Embedded a Video, or Audio.
- Upload file – here you can upload an image to be used as part of the question. The supported file types are jpeg, jpg, png, pdf, ppt, xlsx, docx
- Hint – if you want to provide a hint for your user, then you can enter that here to help them.
- Marks – different questions can have a different ‘weight’ applied to them,e.g. a question with multiple answers may earn more marks than one with a single answer
- Time to Spend – the allotted time for this particular question. Note: when creating courses, where possible, it’s a good idea to allocated similar question types the same length of time, otherwise the testee might spend more time clock-watching than answering questions. After all, the purpose of these questions is to test not to trick.
- Total Number of Answers to Choose From – this is the number of possible answers that they can choose from. This is a dropdown list, and the number of answer options available to fill in, will match the number selected here. When you select this option, the next 2 fields will display:
- Answer Options – the number of answer options will match the total number of answers to choose from, which was selected, above. Here you can add a text answer to the field and a corresponding image. Square images work best here.
Once you’ve added your answer options:
- Enter Correct Answer Option Number – here you select which one of the answer options from above is the correct answer.
- Question Order – this determines where the question will appear in the quiz, i.e. if you want it to be the 7th question, add 7. If this number is already taken/in use, then the original question will not be overridden. It will be appended to the list of those with the same order number:

This is where you set the question order
- Once you’ve added your information, click on the Create button and the question will save, the screen will refresh, and your question will be added to the list of questions for that course.
Search for a Course
The search functionality has been documented a number of times already, refer to Search for a Record for further details.
Enter Offline Exam Results
Not all courses are taken online, but CASSA gives you the capability to give and take exams offline and to then upload the results online. It does this through the Enter Offline Results feature.
- Click on the Enter Offline Results button and the Update Offline Exam Marks list will display:
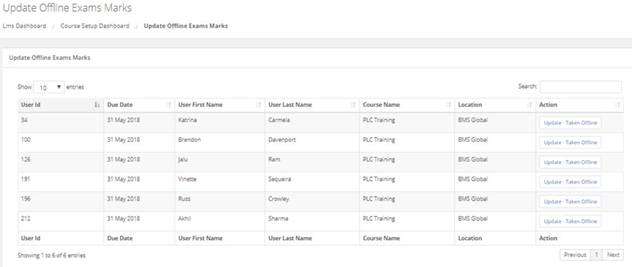
The update offline exam marks grid
- From here, you can:
- Update Taken - Offline results for your staff
- Search for a Staff Member
Update – Taken Offline
To update the test results taken offline for a member of staff:
-
Identify the staff member and the course (via their First Name and Last Name, and Course Name, respectively) that you wish to update.
-
Click on the Update – Taken Offline button and the date dialog will display:
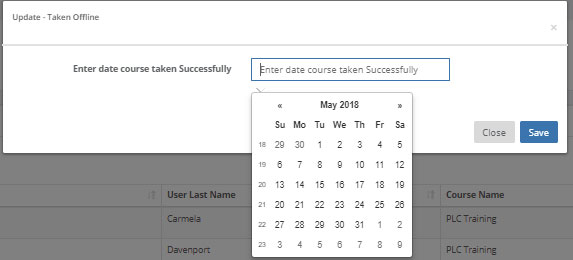
Enter the date the course was taken
- Select the date and then click on Save. The dialog box will close and the course list will update.
Search for a Staff Member
The search functionality has been documented a number of times already, refer to Search for a Record for further details.
Updated over 4 years ago
