My Qualifications
In this post, we'll look at adding and managing your qualifications.
Add Qualifications
CASSA gives your 2 options for adding a qualification to your profile:
- Add Qualification – this is where you can add a qualification that isn’t on our list/growing database
- Select from List – this list feeds from the CASSA database of industry-approved qualifications
Note: we will soon be introducing functionality into CASSA where you can recommend qualifications for inclusion in our database. This will, of course, add to your profile and will make you easier to be found by companies who are looking for employees and contractors with those skills in our forthcoming *‘Job Match’* functionality. Please bear with us for the time being.
Add a qualification
To add a qualification:
- Click on the Add Qualification button and the following form will appear:
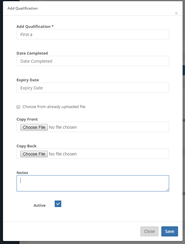
Add qualification form
You can now add the following information: Add Custom Qualification, Date Completed, Expiry Date, add a photograph of your qualification, add custom notes, and select whether this is an ‘active’ qualification for this position.
- Start typing the name of the qualification into the Add Qualification field and suggested qualifications from the CASSA system will in-fill:
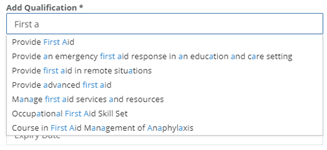
Auto-populating suggested qualifications
-
Select the qualification you require from this drop-down list.
-
Next, select the date you completed this qualification:
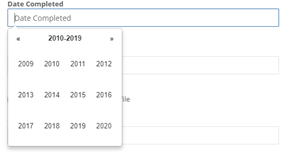
Selecting your qualification date
If you haven’t seen this type of date selector before, you will drill-down into month and then day once you’ve selected the appropriate year. If the year you require isn’t shown, click on either the OR THE to navigate to the correct decade and then select the year you need.
- Now you can add a copy of the actual qualification itself.
If this is the first time for this qualification, then you can upload a copy for both the front and the back of the certificate.
Note: Before you upload your images, bear in mind that you only have a finite storage capability with your account. So, first, make sure you optimise your images (refer to Optimising and Uploading Images for further information); and, second, if you are ever in the situation where a copy of your certification has already been uploaded and you need to refer to it again, then you can tick the Choose from already uploaded file option.
-
Click on the Choose File button in the Copy front field and then navigate to and select the front copy of your certificate.
-
Then do the same for the back copy.
-
If you need to add any notes, you can do them in the notes field.
-
The final field on this form is the Active checkbox, and it’s selected by default.
This checkbox is used to mark this qualification and certificate as being active for whichever employer you’re working for.
The way CASSA works is, if a qualification is required for a role then it will be visible in the company register. If that qualification expiry date then passes, this will then be flagged as expired in the company register and will need to be actioned.
However, if a qualification has expired and/or is not required for any role you’re carrying out then marking it as inactive will ensure it does not appear in any register.
- When the form is complete, it will look like this:
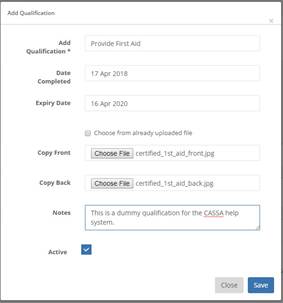
Completed qualifications form
- Click on the Save button and the form will close. The qualification will then be added to your profile:

Qualification added to your profile
As you can see, you can now view the images you’ve uploaded, the status is set to Active, and you can perform either Edit or Delete actions, as required.
Select Qualification from List
If your qualification is an industry-recognised qualification, then you can use the Select From List option.
- Click on the Select From List button and the Add Qualification section will expand to show all listed qualifications:

Select from list > Add qualification
-
Identify and select the qualification that you wish to add and the Add Qualification form, as shown above, will display. The only difference being that, because you’ve already selected the qualification name, this field is absent. However, the remainder is the same, so:
-
Select the date you completed this qualification:
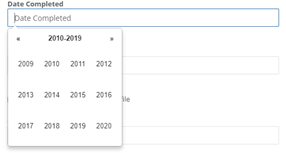
Select the date the qualification was completed/awarded
If you haven’t seen this type of date selector before, once you’ve selected the appropriate year, you then drill-down into month and then day.
If the year you require isn’t shown, click on either the << or the >> to navigate to, first, the correct decade and then, second, the year you need.
- Now you can add a copy of the actual qualification itself.
Note: you only have a finite storage capability with your account, so if you know that a copy of your certification has already been uploaded, then you can tick the Choose from already uploaded file option (refer to ).
If this is the first time for this qualification, then you can upload a copy for both the front and the back of the certificate.
-
Click on the Choose File button in the Copy front field and then navigate to and select the front copy of your certificate.
-
Then do the same for the back copy.
-
If you need to add any notes, you can do them in the notes field.
-
The final field on this form is the Active checkbox, and it’s selected by default.
This checkbox is used to mark this qualification and certificate as being active for whichever employer you’re working for.
The way CASSA works is, if a qualification is required for a role then it will be visible in the company register. If that qualification expiry date then passes, this will then be flagged as expired in the company register and will need to be actioned.
However, if a qualification has expired and/or is not required for any role you’re carrying out then marking it as inactive will ensure it does not appear in any register.
- When the form is complete, it will look similar to this:
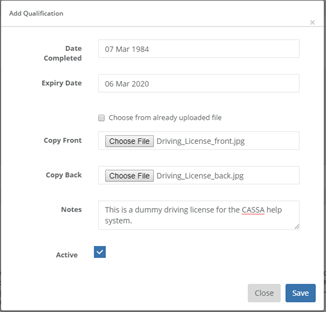
Your complete form
- Check that all is correct and click on Save. The form will close, the screen will refresh, and your qualification will be added:

Your updated list of qualifications
Using Already Uploaded Images
When you need to send your profile and copies of qualifications to someone, you don’t want to send multiple files containing the same information when only 1 file is required.
If you need to add a new qualification and you’ve already uploaded the files that can be used for this qualification, then it makes sense to reuse the ones you’ve already uploaded. To do this:
-
Add your new qualification in the same way as before.
-
Instead of clicking to add new files/images, click on the Choose from already uploaded file option and the following will display:
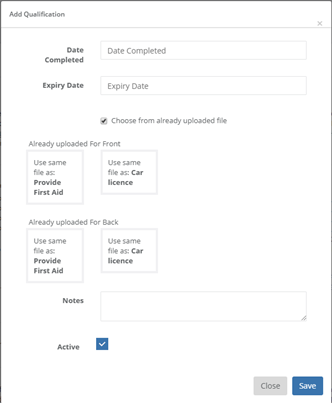
There's no need to upload new images, just choose from the already uploaded gallery
-
Add your Date Completed and Expiry Dates as before, and now select the front and the back files that have already been uploaded by left-clicking on them.
-
Add your notes.
-
Then deselect the checkmark if this is Inactive, otherwise leave it selected:
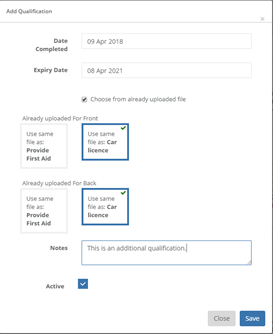
Tick or untick the relevant boxes
- Check over your details to confirm and then click on Save. The new qualification will be added to your profile:

Et voila...your new qualification is added
Manage Qualifications
Once you’ve added a qualification, you have full control over managing it.
As shown in the image above, you can click on the Open button to view the front and back copies of your qualification. You also have an Action column showing a series of other tasks that can be carried.
(Note: the CASSA system follow this pattern for managing records throughout, and additional options may be visible depending on the task being performed and your user credentials).
In this instance, you can carry out the following tasks:
Edit a Qualification
If you wish to edit a qualification, click on the Edit button and you will be able to edit all fields except the course name. As you can see in the image below, I edited the HLTAID course and changed its qualification status to inactive:

Editing qualifications
You can now continue to add any other tasks required.
Delete a Qualification
To delete a qualification:
-
Identify the record you wish to delete in the list.
-
In the Action column, click on the Delete button and the delete confirmation will show.
-
Click on Yes to delete it.
-
The confirmation dialogue will close, and the record will be deleted from the list.
Updated almost 5 years ago
