App Forms
In App Forms you can:
- Add a New App Form
- View Form Information
- Preview an App Form
- Edit an App Form
- Delete an App Form
- Search for an App Form
- Export an App Form
- Print an App Form
Add a New App Form
To add a new app form:
- Click on the Add New App Form button and the Add Form: Step 1 – Basic Information screen will display:
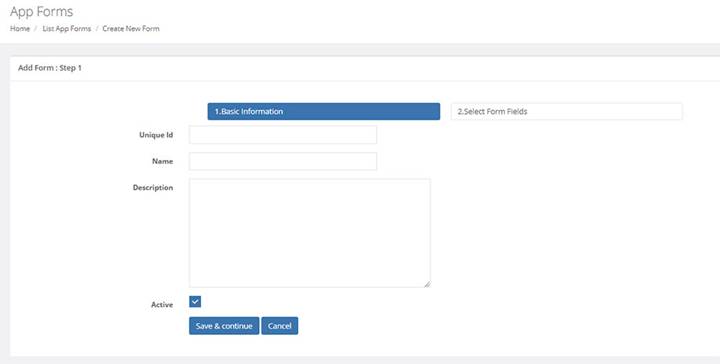
Step 1 for adding a new app form (Basic Information)
- Add your form’s Unique ID, the form’s Name, a Description of what the form is for and where it will be used.
- If the form will be used right away, then you can leave the Active box checked; however, if it’s not to be used immediately or will be unavailable, then deselect that option (and it will become inactive).
- Click on the Save & Continue button when ready.
- You’ll now be taken to Step 2 - Build Form:

Step 2, this is where you'll build your form
Here you can:
Add New Form Field – this is where you can create your own customisable form fields.
Choose From Library – many objects in the CASSA system are reusable and if the field has already been created and added to the library then it’ll be in there.
Preview – the preview button allows you to see how your form will look
Add New Form Field
To add a new form field:
6. Click on the Add New Form Field button and the following will display:
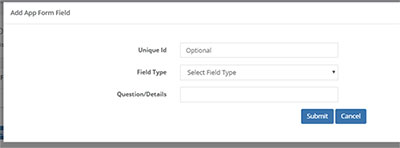
The add app form field
- First, add your Unique ID, and then select the Field Type from the drop-down list:
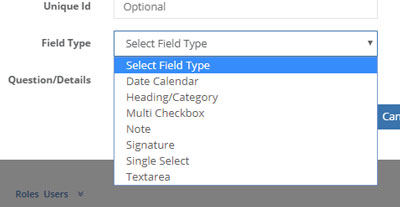
The drop-down list displays the list of available fields
As you can see, you can select from the following field types:
- Date Calendar – this inserts a date picker field which allows the user to select a date.
- Heading/Category – this is used to insert labels into your form. This field is not editable by the user.
- Multi Checkbox – use this to insert questions which have or require multiple answers.
- Note – this inserts a free-text entry field where the user can add their own notes.
- Signature – this is where your user can sign the form.
- Single Select – for questions which require a single answer.
- Textarea – this insert a free-text area where your user can enter text.
- Select your field type and then add the Question you want to ask or, if it’s an instruction rather than a question, the details for that field.
If you select a field type where there are different answer options, then you can add, modify, or delete the answers.
For example, if you select a Multi Checkbox field type, then you’ll be presented with the following:
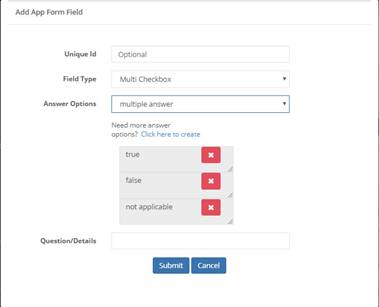
The multi checkbox field type looks like this
If you want to keep the true, false, not applicable options, then there’s no need to make any changes. However, if you want to make changes:
a. Click on the red X to delete that option.
b. Click on the Click here to create link to present the following where you can add your own options:
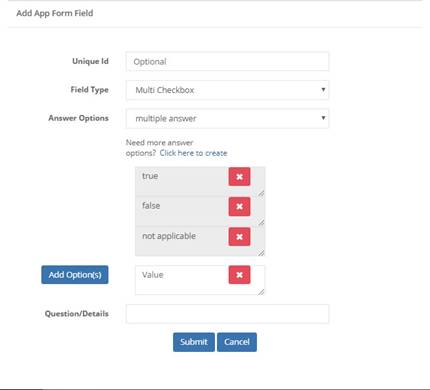
Here's where you can create your own options
c. Add your value to the new field
d. Click on Add Options to add additional options and values
e. When the entire field is complete, including Question/Details, click on the Submit button. The dialog will close, and you’ll be taken to the form page where you can see all the fields on your form:
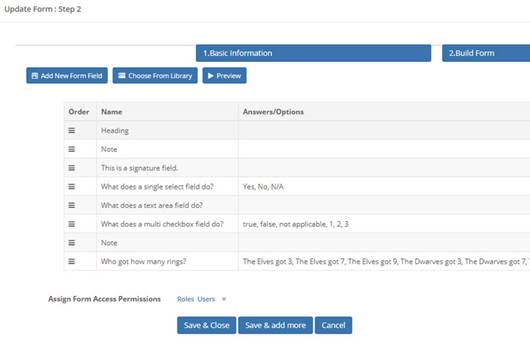
This is how your form may look when you've added the required items
If you want to add a new field, you can either:
- Click on Add New Form Field and the dialog from before will open and you can select a new field type.
- Click on Choose From Library – we cover this in App Fields, but all fields that are created in the app are added to the library for reuse. Click here to open the library where you can then select and insert an already created field.
You can click on the Preview button to see how your form currently looks.
How to Reorder Form Fields
To reorder forms fields, click, drag and drop the left icon to reposition the field:
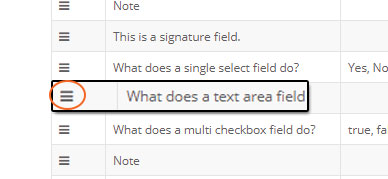
Click, drag-and-drop to reorder form items
Assign Form Access Permissions
Once you’ve created your form, you now need to assign the Access Permissions. To do this:
- Click on the Roles Users drop-down link and the display will expand:
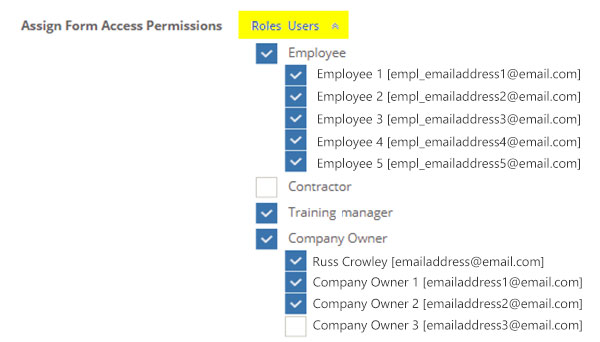
The assign form access permission where you can assign permission to roles and users
- Select the roles and people to whom you wish to grant access.
- Once you’ve completed all your changes, click on 1 of the following:
- Save & Close – this will save the form, close the dialog, and take you to the List App Forms page.
- Save and Add More – this will save the form and take you to a new form.
- Cancel – will reject all changes, close the form, and return you to the List Register Forms page.
View Form Information
To view the information of an existing form:
- In the App forms main grid,click on the hyperlinked form Name.
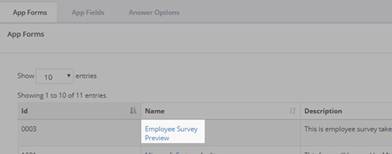
The form name is hyperlinked
- The form’s information will display.
Note: the form can’t be edited here. To do that, you need to go back to the main App Forms grid and click on the Edit button.
Preview an App Form
You can also preview how a form will look from the App Form grid by clicking on the Preview link.
Edit an App Form
To edit a form, in the main App Form grid:
-
Click on the Edit button for the form you wish to edit. The form will open for editing.
-
You can now edit all areas of the form in the same manner as when you create a form
Delete an App Form
To delete a form, in the main App Form grid:
- Identify the form you no longer need and click on the trashcan (button.
- A confirmation dialog will appear asking you to confirm that you no longer need this form. Click on Yes to delete it.
- The form will be removed from the grid.
Note: this step is irreversible, so bear in mind that, once deleted, the form cannot be recovered.
The form grid can become quickly cluttered and can overflow into multiple pages, so often the quickest way to locate a form is to use the search field:
Search for an App Form
- Click in the search field and begin typing the name of the form you wish to locate:

Searching for an app form
-
As soon as you start to enter your search term, the system will filter out all those records that don’t match your term, allowing you to quickly locate the one you require.
-
Click on one of the form’s actions (view, edit, or delete), as required, or
-
Click on the Copy button to copy the search results to the clipboard.

Clicking on the Copy button will copy the search results to the clipboard
- The search results will be copied to the clipboard and can then be pasted elsewhere.

The number of rows copied will be shown
Export an App Form
You can also export the App Form matrix in either the csv or the xlsx format:
- If you want to export the entire matrix, ensure that no search filter is in place (by deleting any text from the search field). If a search filter is in operation, only the filtered results will be saved to the downloadable file.

- To export as csv, click on the csv button and the Save As dialog will open to allow you to save the file to your computer
- To export as an Excel spreadsheet, click on the Excel button. Again, the Save As dialog will display and allow you to save the file to your pc.

Exporting your results
- You can now open the file in the normal manner.
Print an App Form
If you need to print the search results:
-
Click on Print and the print window will open.
-
You can now change print settings, such as Destination printer, the number of pages, page orientation, etc. The actual settings all depends on your own printer.
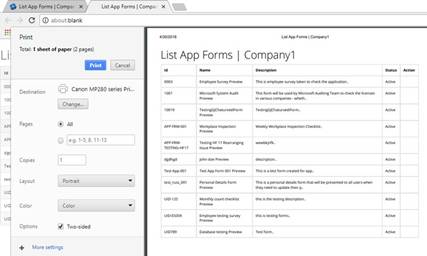
The print preview function. What you see may differ to this (depending on your printer)
- When ready, click on Print to send it to the printer.
Updated almost 5 years ago
