My Profile
Manage your qualifications and other stuff
As you can see, your personal information and other account-related items are grouped into the following tabs:
- General Information
- Emergency Information
- Change Email
- Change Password
- Signature
- Timezone
- Privacy Settings
General Information
As you can see from the image below, I’ve populated all the information in the General Information tab already, but you’ll need to fill in all the required details for you.
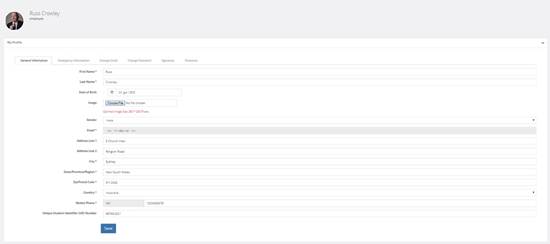
General information
These include your First Name, Last Name, Date of Birth, a recent image of you (a head & shoulders shot is best), your Gender, Address, Location, Mobile Phone, etc.
Required Fields
You’ll notice that some fields labels have an asterisk (*) next to them. This denotes that the field is a required field: you must add this information before proceeding.
We use this asterisk (*)/required field method throughout the entire CASSA system, so whenever you see this next to a field, then that particular field is required.
Also, some of the fields in our system may be country dependent. This could be due to national, federal, or state laws or regulations.
For example, if you take a look at the image above, you can see the Unique Student Identifier (USI) Number at the bottom of the image. The USI is a requirement in Australia, but maybe not so in other countries. If you don’t see all the fields that are displayed in this demo then that’ll be why.
What you also need to bear in mind when adding your profile details is that these are the exact details that will be required when a company contacts and hires you later. As you can no doubt appreciate, the more information you add now, the better and easier it’ll be for you in the future.
This also applies for the next step, Emergency Information. But, one thing you should get in the habit of doing with all software, whether it’s online of off, is to regularly save your information. Let’s do that now:
Click on the Save button and, when your details have been saved, click on the Emergency Information tab.
Emergency Information
None of the emergency information fields are mandatory in CASSA. It’s your call if you want to add any information here.
Just so you are aware, within CASSA, you can select to hide or show every single field on your profile, so even if you add the information here now, let’s say for ease of your own access, then you can always hide it from view so no-one else will ever see it (refer to Privacy Settings).
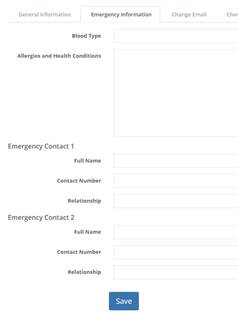
Emergency information tab
On that note:
Add your blood type, Allergies and Health conditions, plus the full name, contact number, and relationship details of your emergency contacts. We recommend 2 contacts, but again, none of this is mandatory and it’s up to you.
Once you’ve completed your emergency information, click on the Save button.
Change Email
No surprises what you can do on this tab… when you need to change your registered email address you can do so here.

Changing your email address
Changing it is self-explanatory, but just to be sure:
-
Enter your new email address (the one you want it changing to) in the Change Email field and then click on Save.
-
The screen will refresh, and a confirmation email will be sent to the email address you just specified.
-
When the email arrives, you will need to click on Verify to change your email address on the CASSA system. Your currently registered email address will not change until you’ve confirmed this.
Change Password
If you ever need to change your password in CASSA, this is where you do it.
To prevent someone sneaking in and changing your details while your back is turned, you will need to enter both your existing password and your new password (as with all passwords, you need to confirm the password to ensure you’ve entered it correctly).

Change your password (regularly)
Once you’ve done this, click on the Save button.
LastPass
As before, we recommend LastPass for managing your passwords.
When you do something like changing your password, LastPass will recognise that you have already saved this account and password and ask you if you want to create a new record or update an existing record: it keeps the whole thing simple.
If you don’t have LastPass, I’d recommend you check it out here.
Signature
This is where you can upload your signature. We recommend using a png file with a transparent background. That way your signature will display correctly on any coloured page. If you use a jpeg or other format, it’s likely there’ll be a white background to your signature and this will look awful on anything but a white page.

Upload your own signature image
-
Click on the Choose File button and navigate to where your image is stored.
-
Double-click on the image to select and upload it. Once uploaded, a thumbnail image of your signature will display.
-
Click on Save to save it to the system or click on Choose File again if you wish to upload a different signature file.
Timezone
- You can also set your timezone by clicking on the Timezone tab and then selecting your location from the drop-down list.

Set your timezone
- Click on Save to save your timezone to the CASSA system.
Privacy settings
Note: sorry, we ran out of time and this didn’t actually get added as a tab. Rest-assured, it’ll be a tab in the next release, but in the meantime, click on the dropdown arrow underneath your profile picture and you can select Privacy settings there. It’s a nice place to have it, but we think it’ll be much better as a tab in your My Profile section. Thanks for your patience and understanding.
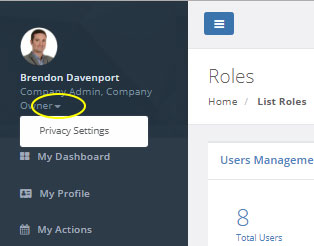
Access your privacy settings
Your privacy settings allow you to show or hide all aspects of your profile from an employer or a client, and they can be updated at any time.
The sections are collapsible and have been grouped as follows for ease of use and management:
- Profile Privacy Settings
- Qualifications Privacy Settings (see note, below)
- Verification of Competency (VOC) Privacy Settings (see note, below)
- Login as Privacy Settings (see note, below)
Note: the functionality for Qualification Privacy settings, Verification of Competency (VOC) Privacy settings, and Login as Privacy settings is the same, so it’s been grouped under the heading of Other Privacy Settings.
Other Privacy Settings
Click on Profile Privacy settings to view the contents:
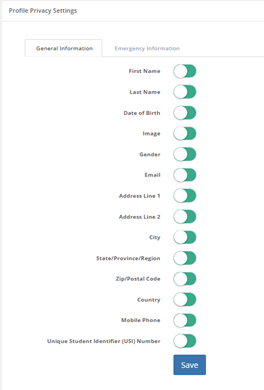
Profile privacy settings
As you can see, by default, the General Information tab shows, and all fields are set to be visible/show (coloured green). If you want to hide any fields, click on the toggle option and then click on Save and the toggle will switch to the right, and the visible colour will change to red to denote it’s now invisible.
Once you’ve done this, you can then do the same for your Emergency Information.
You can come back here at any time to modify the settings.
As always, don’t forget to save your changes.
Other Privacy Settings
The privacy settings for the other sections is exactly the same as we’ve just covered.
You can expand all 3 sections to see what’s listed:
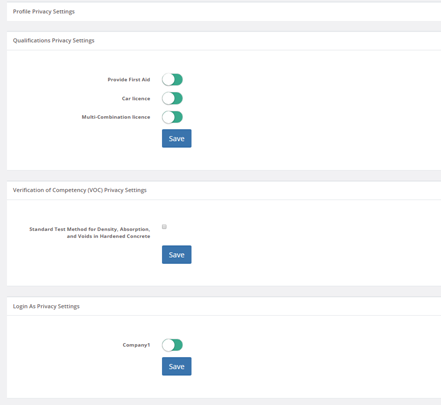
Other privacy settings
Again, you can toggle/select these to either display (green) or hide (red) them.
Click on Save when you’re done.
Login As Privacy Settings
This particular setting allows you to grant permission for an employer to log-in to your profile.
Note: no-one who logs in under this setting can delete any information or records, they can only add information.
This setting is useful when you work for a company and carry out training or certification with them. This then permits their authorised administration personnel to upload any required information on your behalf. This makes it easier for you and saves you time, hassle, and the need to track it down and do it yourself.
As you can see from the image above, Login As Privacy Settings for Company1 is set to permit (coloured green).
If it was set to deny, it would look like so:
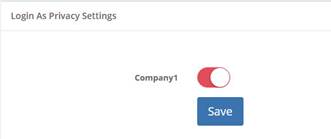
Tooggling privacy settings to 'deny'
That’s it, that’s your profile setup on the CASSA system.
Your profile is an incredibly powerful attribute, and it’s one that will help you to secure work with minimal hassles in the future.
Updated over 4 years ago
